Monday, November 28, 2011

TUTORIAL - ADDING COLOUR TO YOUR DESIGNS


What items are available to add colour to your designs. At first glance you may think that finding colours in ag materials is difficult but there are many materials out there that can be used to add colour. Followed by a tutorial on makeing flowers with tailpaint and milk filters.

  1. Hayband comes in many colours and thicknesses. Pink, yellow, blue, white, black, orange. Hayband is very like raffia and can be split into thinner threads which can be used for embroidery, tassles, crocheted and knitted, braided and woven.
  2. Ear Tags are made from a thick soft plastic and come in an array of colours also. They are small and can be expensive but are great for smaller details - buttons or accesories like necklaces etc as an example - they can be easily cut with
    scissors or craft knife.
  3. Shade cloth is available in many colours, but most stores only stock green, cream or black. Look online for other colours like orange, red and blue.
  4. Plastic liners from fruit and vegie boxes also come in many different colours
  5. Feed and seed bags can be limited in colours but some available are orange, green, yellow and blue
  6. Natural dyes can be derived from many items found on the farm, onion skins, beetroot, coffee, tea etc
  7. Plastic lids and rings of chemical drums - wash these well
  8. Leg and tail tapes - come in a range of bright colours. Tapes are similair to duct tape and some are like giant velcro strips
  9. Tail and stock marking paints. This is a personal favourite of mine. Available in a rainbow of colours but most of them have an oil/waxy base which makes them sticky even when they are dry. I have found one brand that does not have a sticky base but is only available in a few colours and of course is more expensive.

TUTORIAL
    My first dress I ever made I used tailpaints to colour milk filter fabric to make flowers. I punched the flowers out using my Sizzix die cutting machine. So they where only a two dimensional flower. I have since progressed to makeing 3 dimensional flowers useing a folding technique. The tailpaint I use is Shoof Stock Mark which does not have a sticky base, but is also not totally waterproof (which is fine if you do not plan on washing your dress)

    Spray your milk filter - here I have only sprayed on one side to add contrast. Cut into 2 inch strips. The width of your strip will denote the size of your flower
    With the colour side down roll for approx 1.5 inchs to create the centre bud and secure with glue.Holding the bud in your left hand, grab the tail approx 1 inch from bud and turn down. Wind around bud and secure with glue.


    It is at this stage that I think it isn't going to work but perservere and it will all come together

Continue with the last step turning down and securing until at the desired size, cut off the stem that will have formed on the underside if desired and turn end over and glue down over underside of flower.

Pictured is a flower made with a 1.5 inch strip and another useing a three inch strip. Practice with tension, an tight wrap will get a smaller bud type flower, I use a looser tension to get a more open flower.
A search on Google for makeing fabric flowerswill bring up numerous tutorials for makeing flowers, which can be easily adapted/used for ag materials, plastics, papers, hessian etc

Thursday, November 24, 2011

TUTORIAL - WORKING WITH WOVEN POLYPROPYLENE (PART 2)

This fabric found in feedbags, seedbags, tarpaulins,weedmatting etc has a propensity to shred by just looking at it. Even so there are some great design effects you can get using it. Firstly we will look at fringing and then I will cover some of the other things you can do with the fabric

FRINGING
Cut your fabric lengthwise into 6.5 inch strips

Fold in half lengthwise and of set by 1/2 inch
Lift the cutter on your overlocker a sew along the folded edge
Now the messy stuff starts - pull out the loose lengths of fabric. They will pull out easily along the sewn edge so you can fringe right to the top. A pair of fine long bladed scissors make it alot easier to grab hold of fabric.
The finished product. Great to use in alot of ways, layer it, along hemlines, make longer fringing and use for wigs, roll together and make fluffy flowers.
And what you are left with. These longer strips can be knitted and crocheted into a fabric. This fabric can be a bit stiff and scratchy, but experimentation with density and tension may find a softer way of useing it. It can also be curled with scissors like you do with ribbon for a different effect. This fabric can also be heat welded to a certain degree, it does get very stiff and scratchy. At really hot temps for an extended period will just melt it away.


Tuesday, November 22, 2011

AG ART IN SCHOOLS

Some schools use Ag Art in their textile curriculums, and as a part of there exam processes as well. What a wonderful opportunity for students to explore, art, textiles and farming at the same time. There have been some wonderful young designers coming through. There are a couple of schools only shows that are for year 7 students through to Tertiary/University level. Agfest, in Carrick, Tasmania, has a large school/youth Ag Art show. The next show is from Thursday 3rd to the 5th May 2012. Kilmore, Victoria, also has an Ag Art show for schools. This is a new show this year so hopefully they will have had a successful first show and be back again in December next year.

Of course all shows have an under 21 section, so there is plenty of opportunity for youth to enter designs throughout the year.

If you are a teacher and interested in incorporating Ag Art into your curriculum, I encourage you to do so. It is a wonderful opportunity for students, to possibly have a win and encourage them to further explore fashion design/textiles as a vocation.

THAT WOW MOMENT

You know that moment when you discover something new you can do with a material. WOW, that works, kind of thing. Well I just had one, with the woven polypropylene. As soon as I realized it worked I had multiple ideas on how to use this technique. Oh but do I really want to share it. Of course I will, because this is what this blog is all about and if anything I find helps or inspires someone to design it will go on here. Butttttt you will have to wait, I will be posting in the next few days some design techniques that I have used or can be done with woven polyproplyene. So staying watching

Monday, November 21, 2011

LAST SHOW OF THE YEAR - KILMORE 3rd Dec

Kilmore is the last Ag Art show of the year. This is their first year and entry is for students only. So hopefully they will have alot of support and continue on next year. They have three sections
  1. grades 7 - 9
  2. grades 10 - 12
  3. tertiary - University/other
Entries are now closed, but head along if you are in the area to offer your support and check out some amazing garments

Saturday, November 19, 2011

AG ART - AN THEY DIDN'T KNOW IT

Aren't these ghost dresses gorgeous. They are designed as a garden ornament. But I post this here to show how a hard element like chicken wire can be made to look soft and flowing. Would look amazing on the runway, but what would you put under it?

Thursday, November 17, 2011

TUTORIAL - WORKING WITH WOVEN POLYPROPYLENE (PART 1)

Woven polypropylene fabric is used in the manufacture of feed bags, weedmat and tarpaulins. It can be a difficult material to work with due to it's propensity to shred into pieces at the touch of a hand. If you cut pattern pieces first they will shred to pieces as you sew it. In this first part I will show you how to sew this difficult medium with ease. I use two different techniques, one for light and one for dark. Lets start with the light fabric as it is the easiest. You WILL need an overlocker as it locks in the fabric really well, you could use a normal machine with a zigzag stitch but that will involve careful cutting. Okay here we go.

LIGHT FABRIC

1. On light fabrics draw your pattern onto fabric with a dark permanent marker, make sure you include seam allowances


2. Sew around your drawn pattern, using your drawn lines as your cutting guide. Do not pull through when you have finished each line as you will pull fabric apart and distort the final pattern piece


3. Continue Sewing and cutting around your drawn pattern piece until it has been completely sewn/cut. When joining pattern pieces together, use your overlocker, but without the blade. For finishing hems it is quicker to turn up overlocked stitch and use hot glue, alternativly you may use a straight stitch.


DARK FABRIC

I deal with dark fabric differently, due to not being able to mark with a pen, of course you could use a white paint pen

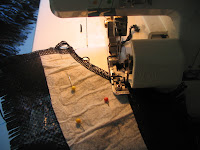
1 Draw pattern on to fabric, remember to allow seam allowances, I use milk filters, calico would also work, but is considered a commercial fabric I think. If using calico you could cut it out at the final step. Pin firmly to your fabric


2. Sew around your pattern piece, using the outside edge as your cutting guide. Once again do not pull fabric through at the end of each row of sewing.


3. Continue Sewing and cutting around your drawn pattern piece until it has been completely sewn/cut. When joining pattern pieces together, use your overlocker, but without the blade. At this point you need to decide if you can leave your pattern fabric on or not. I leave mine on for stability, but if you have used calico or other fabric it is an idea to remove it. Cut as close to the inside sewn line to remove, do this carefully so you don't cut the plastic fabric.


4. When joining pattern pieces together, use your overlocker, but without the blade. For finishing hems it is quicker to turn up overlocked stitch and use hot glue, when leaving the pattern fabric in I prefer to sew up the hems using a straight stitch


Next tutorial in this series will show some different design techniques that can be used with this fabric.