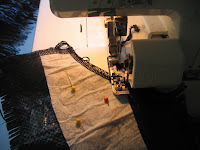
Woven polypropylene fabric is used in the manufacture of feed bags, weedmat and tarpaulins. It can be a difficult material to work with due to it's propensity to shred into pieces at the touch of a hand. If you cut pattern pieces first they will shred to pieces as you sew it. In this first part I will show you how to sew this difficult medium with ease. I use two different techniques, one for light and one for dark. Lets start with the light fabric as it is the easiest. You WILL need an overlocker as it locks in the fabric really well, you could use a normal machine with a zigzag stitch but that will involve careful cutting. Okay here we go.
LIGHT FABRIC
1. On light fabrics draw your pattern onto fabric with a dark permanent marker, make sure you include seam allowances
2. Sew around your drawn pattern, using your drawn lines as your cutting guide. Do not pull through when you have finished each line as you will pull fabric apart and distort the final pattern piece
3. Continue Sewing and cutting around your drawn pattern piece until it has been completely sewn/cut. When joining pattern pieces together, use your overlocker, but without the blade. For finishing hems it is quicker to turn up overlocked stitch and use hot glue, alternativly you may use a straight stitch.
DARK FABRIC
I deal with dark fabric differently, due to not being able to mark with a pen, of course you could use a white paint pen
1 Draw pattern on to fabric, remember to allow seam allowances, I use milk filters, calico would also work, but is considered a commercial fabric I think. If using calico you could cut it out at the final step. Pin firmly to your fabric
2. Sew around your pattern piece, using the outside edge as your cutting guide. Once again do not pull fabric through at the end of each row of sewing.
3. Continue Sewing and cutting around your drawn pattern piece until it has been completely sewn/cut. When joining pattern pieces together, use your overlocker, but without the blade. At this point you need to decide if you can leave your pattern fabric on or not. I leave mine on for stability, but if you have used calico or other fabric it is an idea to remove it. Cut as close to the inside sewn line to remove, do this carefully so you don't cut the plastic fabric.
4. When joining pattern pieces together, use your overlocker, but without the blade. For finishing hems it is quicker to turn up overlocked stitch and use hot glue, when leaving the pattern fabric in I prefer to sew up the hems using a straight stitch
Next tutorial in this series will show some different design techniques that can be used with this fabric.
 Cut your fabric lengthwise into 6.5 inch strips
 Fold in half lengthwise and of set by 1/2 inch
 Lift the cutter on your overlocker a sew along the folded edge
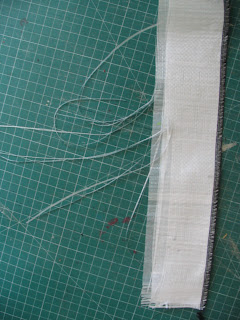 Now the messy stuff starts - pull out the loose lengths of fabric. They will pull out easily along the sewn edge so you can fringe right to the top. A pair of fine long bladed scissors make it alot easier to grab hold of fabric.
 The finished product. Great to use in alot of ways, layer it, along hemlines, make longer fringing and use for wigs, roll together and make fluffy flowers.
 And what you are left with. These longer strips can be knitted and crocheted into a fabric. This fabric can be a bit stiff and scratchy, but experimentation with density and tension may find a softer way of useing it. It can also be curled with scissors like you do with ribbon for a different effect. This fabric can also be heat welded to a certain degree, it does get very stiff and scratchy. At really hot temps for an extended period will just melt it away.