What items are available to add colour to your designs. At first glance you may think that finding colours in ag materials is difficult but there are many materials out there that can be used to add colour. Followed by a tutorial on makeing flowers with tailpaint and milk filters.
- Hayband comes in many colours and thicknesses. Pink, yellow, blue, white, black, orange. Hayband is very like raffia and can be split into thinner threads which can be used for embroidery, tassles, crocheted and knitted, braided and woven.
- Ear Tags are made from a thick soft plastic and come in an array of colours also. They are small and can be expensive but are great for smaller details - buttons or accesories like necklaces etc as an example - they can be easily cut with
scissors or craft knife. - Shade cloth is available in many colours, but most stores only stock green, cream or black. Look online for other colours like orange, red and blue.
- Plastic liners from fruit and vegie boxes also come in many different colours
- Feed and seed bags can be limited in colours but some available are orange, green, yellow and blue
- Natural dyes can be derived from many items found on the farm, onion skins, beetroot, coffee, tea etc
- Plastic lids and rings of chemical drums - wash these well
- Leg and tail tapes - come in a range of bright colours. Tapes are similair to duct tape and some are like giant velcro strips
- Tail and stock marking paints. This is a personal favourite of mine. Available in a rainbow of colours but most of them have an oil/waxy base which makes them sticky even when they are dry. I have found one brand that does not have a sticky base but is only available in a few colours and of course is more expensive.
TUTORIAL
My first dress I ever made I used tailpaints to colour milk filter fabric to make flowers. I punched the flowers out using my Sizzix die cutting machine. So they where only a two dimensional flower. I have since progressed to makeing 3 dimensional flowers useing a folding technique. The tailpaint I use is Shoof Stock Mark which does not have a sticky base, but is also not totally waterproof (which is fine if you do not plan on washing your dress)
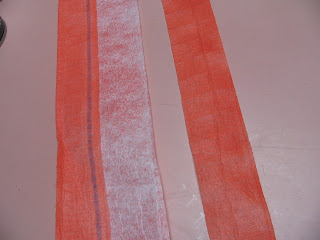
Spray your milk filter - here I have only sprayed on one side to add contrast. Cut into 2 inch strips. The width of your strip will denote the size of your flower
With the colour side down roll for approx 1.5 inchs to create the centre bud and secure with glue.Holding the bud in your left hand, grab the tail approx 1 inch from bud and turn down. Wind around bud and secure with glue.

It is at this stage that I think it isn't going to work but perservere and it will all come together

Continue with the last step turning down and securing until at the desired size, cut off the stem that will have formed on the underside if desired and turn end over and glue down over underside of flower.

Pictured is a flower made with a 1.5 inch strip and another useing a three inch strip. Practice with tension, an tight wrap will get a smaller bud type flower, I use a looser tension to get a more open flower.

A search on Google for makeing fabric flowerswill bring up numerous tutorials for makeing flowers, which can be easily adapted/used for ag materials, plastics, papers, hessian etc
No comments:
Post a Comment